Being near the ocean is my sanctuary..You can let go of all your feelings here...Life is good! Enjoy it!!
Showing posts with label Recipes. Show all posts

Friday, May 4, 2012

The Very Best Banana Pancakes

If you have some overly ripe bananas sitting there looking at you, this is a great thing to do with them! No syrup needed!

by Bad Girl Bbq

INGREDIENTS: 
1 cup all-purpose flour
1 tablespoon white sugar
2 teaspoons baking powder
¼ teaspoon salt
¼ teaspoon vanilla extract
1 egg, beaten
1 cup milk
2 tablespoons vegetable oil
2 ripe bananas, mashed
1 banana sliced thinly
½ cup powdered sugar

COOKING MUSIC SELECTION: Jack Johnson- Banana Pancakes

PREPARATION:
Combine flour, white sugar, baking powder and salt. In a separate bowl, mix together egg, milk, vegetable oil and bananas.   Stir flour mixture into banana mixture; batter will be slightly lumpy. 

Heat a lightly oiled griddle or frying pan over medium high heat. Pour or scoop the batter onto the griddle, using approximately 1/4 cup for each pancake. While they are in the pan, place slices of banana on the uncooked side and then fip them over. Cook until pancakes are golden brown on both sides, spread butter over them while they are hot and sprinkle with powdered sugar and serve. BEST Pancakes EVER!!!!!!

Dungeness Crab Eggs Benedict Recipe


INGREDIENTS:
2 English muffins, split
1 fresh live dungeness crab, cooked, shelled
4 large eggs, very fresh

Topped with my Hollandaise Sauce, here is a great easy recipe -
Easy Blender Hollandaise Sauce Recipe


COOKING MUSIC SELECTION: Faith No More:The Crab Song 

PREPARATION:

by Bad Girl Bbq
Begin by heating a pan with about 2 inches of water. When the water comes to a boil, lower it to a simmer. Crack an egg into a bowl and then using the handle of a wooden spoon, create a whirlpool and gently slide the egg in. You want the white of the egg to wrap around the yolk. Continue with the other eggs. Poach in gently simmering water for 3-5 minutes. You want the whites set and the yolks runny.

Meanwhile, toast the English muffins. When the eggs are done, take them out with a slotted spoon and put them on a paper towel lined plate. Sprinkle with salt and pepper if you desire.

Put some crab meat on top of each half of the English muffins. Top with a poached egg, 1-2 tablespoons of hollandaise sauce, and a sprinkle of salt and pepper and serve.This is AMAZING!!!!!  Your friends will love it! 

Easy Blender Hollandaise Sauce

Need an elegant quick Hollandaise Sauce for brunch?  Here is the easiest best recipe EVER!  


INGREDIENTS:
3 egg yolks
1/2 teaspoon salt
1 dash cayenne pepper
1 tablespoon heavy cream
1 cup unsalted butter, melted
1 tablespoon fresh lemon juice

COOKING MUSIC SELECTION:Etta James - A Sunday Kind Of Love

PREPARATION:
Place egg yolks, salt, pepper and cream in blender, blend for a few seconds at high speed until you have a smooth frothy mixture. 

While blender is running begin adding hot butter in a thin, steady stream. As you add butter, the sauce should thicken. When half the butter has been added, add lemon juice. Continue blending until all butter is used.

Lobster with Chipotle-Lime Butter


Sexy food... served with champagne, or fine tequila over ice… big down pillows, no utensils allowed…served in nothing but an apron… as a main course...optional.
It’s what’s for ~ DINNER IN.


by Bad Girl Bbq

INGREDIENTS:

1 cup of sweet butter (3 cups melted butter set aside, optional)
Juice of 2 limes
2 tablespoons fresh ground Chipotle Peppers
Kosher Salt, as needed
Fresh ground Black pepper, as needed


2 whole live Maine lobsters, about 1 1/2 pounds each
A nice shake of Old Bay Seasoning, or your favorite barbecue rub, as needed
rubber sheet, goggles (Optional)


PREPARATION:
Prepare the grill for cooking over direct medium heat. In a small saucepan, melt the butter and blend in the lime juice, ground Chipotle peppers (I buy the kind at my local mexican food mart and then grind them in my little electric 'coffee' - spice grinder ~ you can taste the difference let me tell ya), and salt and pepper to taste. Set aside.

Split the lobsters completely in half down the back with a chef's knife. Remove the tails and claws. Discard the rest. Crack the shells on the claws and inject or drizzle them each with 1 tablespoon of the butter. Season the tails lightly with the Old Bay or rub. Grill the tails and claws for about 5 minutes on each side. Spoon some of the Chipotle-Lime Butter into the tail shells. Cook until the lobster is just barely done, another 4 to 5 minutes. This will vary depending on your grill. Serve the remaining Chipotle-Lime Butter for dipping. Serve additional butter in creative ways. 


And another by Bad Girl BBQ

Stupid Easy Teriyaki Baked Chicken

Here's a great recipe that is super easy and yummy!

INGREDIENTS:  
1 fresh whole fryer chicken, cut up
1 cup soy sauce
½ cup sugar
¼ teaspoon minced fresh ginger
1 clove garlic, crushed
Butter, melted
1 cup fresh pineapple, cubed
1 medium onion, sliced
1 small Red bell pepper, sliced

COOKING MUSIC SELECTION: Robyn - Konichiwa Bitches

PREPARATION:
Combine soy sauce, sugar, ginger and garlic in large bowl. Stir until sugar dissolves. Add chicken and marinate 3 to 4 hours. Remove chicken and season with pepper. Brush with melted butter. Place in shallow baking pan and bake for 30 minutes at 350 degrees (covered). Remove from oven and turn chicken. Add pineapple (with the juice), red pepper and onion slices. Continue baking for 30 to 40 minutes until chicken is done. Cover until the last 15 minutes, then uncover for browning. Serve with rice and pour juice over all.

Roasted Pesto Portabellas

by Lauren on April 12, 2010
Roasted Pesto Portabella Sometimes you need a lot of discussion, and sometimes you don’t. Sometimes all you really need is a delicious and healthy dinner within 30 minutes of walking in the door after work. Sometimes you have arugula pesto in the freezer. And sometimes you want tomatoes in March.
Sadly, tomatoes in March are generally not allowed, so I’ll encourage you to whip this recipe out again in August, when you have a big, juicy beefsteak and have already had one-too-many tomato salads. That said, my fresh tomato refuge in winter is grape tomatoes, which somehow manage to be red and juicy most of the time. While they certainly aren’t local this time of year, they are passable until we start getting our farm box bounty (this week! Fashizzle!).
Pesto Portabella
Look, I'm melty!
This recipe has you smear portabella caps with pesto and toss them in the oven. Once they’re almost cooked through, you top them with a simple conglomeration of halved grape tomatoes and goat cheese. And once that’s pretty much warm, you top it all with fresh mozzarella and cook until melty. A little salt and pepper, serve with a salad and some simple pasta or rice, and voila: delicious weeknight dinner.
While I made this with homemade arugula pesto, it would be just as delicious with basil pesto (homemade or not). If you’re using the storebought kind that comes in a jar, you may want to drain off some of the oil, as you’re looking for more of a paste than a sauce. Home Hydroponics in the Strip has delicious prepared basil pesto throughout the year.
Pesto Portabella
Before roasting, smear at least a tablespoon of pesto onto the mushroom
Roasted Pesto Portabellas
A Burghilicious Original
As for scraping the gills out of portabellas: In a little research, I discovered that the main reason to scrape the gills out of your portabellas is that they might turn what you are cooking brown or grey, which, depending on what it is, might not be pretty. Therefore, in this dish, no need to scrape them out – and in fact, they are brilliant for holding on to pesto! So I say, don’t bother.
Olive oil for drizzling
4 large portabella mushroom caps, wiped clean and degilled if you like
1/4 cup pesto (or more)
1/2 pint cherry tomatoes, halved
2 tablespoons crumbled goat cheese
4 slices fresh mozzarella
Salt and pepper, to taste
Preheat oven to 400 degrees F. Place portabella caps gill side up on a cookie sheet and drizzle with olive oil. Smear at least 1 tablespoon pesto onto each mushroom, getting the pesto down into the gills. Transfer to oven and roast 10 minutes.
While mushrooms are roasting, combine tomatoes and goat cheese. Season to taste with salt and pepper. After 10 minutes, top each portabella with the tomato-cheese mixture, then return for 5 minutes more. Finally, top each mushroom with fresh mozzarella and roast until the cheese is melted. Top with a few grinds of fresh black pepper and enjoy!
Pesto Portabella
Share this

Thursday, May 3, 2012

Seared Tuna with Lime Crust


This is a quick and easy dish, with big flavor and it features one of my favorite all-time ingredients; ahi tuna. Here it's combined with lime and herbs and gets a nice kick from red chillies. Served over noodles and rocket (arugula) it makes a light and tasty lunch or dinner. 

Seared Tuna with Lime Crust
Flavours, Donna Hay
(Serves 4)

375 g (12 oz) tuna fillet
1 Tbsp grated lime rind
1/3 cup (2 3/4 fl oz) lime juice
1/4 cup finely chopped fresh dill
2 Tbsp chopped fresh parsley
2 small red chillies, seeded and chopped
2 Tbsp olive oil
sea salt and cracked black pepper
400 g (13 oz) fettuccine
1 Tbsp olive oil, extra
100 g (3 1/2 oz) baby rocket (arugula) leaves
extra lime juice and olive oil to serve

Trim the tuna of any sinew and place in a shallow dish. Combine the lime rind, lime juice, dill, parsley, chillies, olive oil, salt and pepper and pour over the tuna to coat. Refrigerate for 20 minutes, turning once. 

Cook the pasta in a large saucepan of boiling water until al dente. Drain. While the pasta is cooking, heat the extra oil in a frying pan over high heat. Remove the tuna from the marinade and reserve the liquid. Cook the tuna for 1 minute per side or until well seared, then slice.  

To serve, pile the pasta on serving plates and top with rocket leaves, sliced tuna and the reserved marinade. Drizzle with a little olive oil and lime juice before serving. Serves 4.

Notes/Results: Lovely! The lime and herb crust really compliments the tuna and the spice from the chillies, with the peppery bite of the arugula is the perfect accompaniment. It goes together easily and you can have a beautiful plate of food on the table in 30 minutes (most of that time is marinating the tuna). Rather than the fettuccine called for, I used a rice noodle and I lessened the olive oil slightly, but otherwise kept it the same.

Chiles Rellenos with Tomato-and-Avocado Salsa


Chiles Rellenos with Tomato-and-Avocado Salsa
Anson Smart
Provided by:
total prep
Jennifer Zavala's downfall in the first episode of Top Chef Season 6 was her insistence on using seitan (made from wheat gluten) for vegetarian chiles rellenos, but not in a way that improved the classic stuffed peppers. She also covered her clunky, overstuffed poblanos in a thick, unappealing crust. Instead, Gail Simmons fills poblanos with a traditional mix of cheese and jalapeños, then tops them with a bright, fresh salsa.

Ingredients

  • 6 medium poblano peppers, about 3 ounces each
  • 1 tablespoon(s) vegetable oil
  • 1/2 small onion, minced
  • 1 small garlic clove, minced
  • 1 small jalapeño, seeded and minced
  • 6 ounce(s) Monterey Jack cheese, shredded 1 1/2 cups
  • 1/4 cup(s) freshly grated Parmigiano-Reggiano cheese
  • 2 tablespoon(s) chopped cilantro
  • Salt
  • 1 1/2 cup(s) grape tomatoes, quartered
  • 1 Hass avocado, finely diced
  • 1/4 cup(s) finely chopped onion
  • 2 tablespoon(s) chopped cilantro
  • 1/2 small jalapeño, seeded and minced
  • 2 tablespoon(s) freshly squeezed lime juice
  • Salt and freshly ground pepper

Directions

  • 1. Make the Chiles Rellenos: Roast the poblanos directly over a gas flame or under a broiler, turning occasionally, until they are charred all over. Transfer the poblanos to a bowl, cover with plastic wrap and let cool. Peel the poblanos. Using a small, sharp knife, make a small lengthwise slit in each one, near the stem end. Using kitchen scissors, carefully cut out the core and seeds, then remove the core and seeds without tearing the poblanos or enlarging the opening.
  • 2. Preheat the oven to 425°. In a small skillet, heat the vegetable oil. Add the diced onion, garlic and jalapeño and cook over moderate heat, stirring occasionally, until softened, about 5 minutes. Let the vegetable mixture cool, then stir in the Monterey Jack, Parmigiano-Reggiano and chopped cilantro. Press the cheese filling into 6 logs.
  • 3. Lightly season the insides of the poblanos with salt. Carefully stuff the cheese filling into the poblanos and press the poblanos closed. Place the stuffed poblanos on a baking sheet and roast in the upper third of the oven for about 12 minutes, until the cheese is melted.
  • 4. Meanwhile, Make the Salsa: In a bowl, combine the grape tomatoes with the diced avocado, onion, cilantro, jalapeño and lime juice and season the salsa with salt and pepper.
  • 5. Transfer the chiles rellenos to plates, spoon the salsa on top and serve.

Tuesday, May 1, 2012

Slow Oven-Roasted Tomatoes


You say tomato. I say slow oven-roasted tomato...

Oven roasted San Marzano tomatoes by Eve Fox, Garden of Eating blog, copyright 2011
The Garden of Eating

When I saw these pop up on Food In Jars' Facebook page a couple weeks ago, I knew that I would be making them. They are the most delicious thangs -- sweet, chewy, and intensely tomato-ey (it's my blog so I can make up any words I feel like.) The long roasting concentrates a whole tomato's worth of flavor into the delightfully shriveled, slightly gooey treat that remains at the end of 10-12 hours in the oven.

While not exactly quick, they are sublimely easy to make. All you do is preheat your oven to 200 F. While you're waiting, wash the tomatoes.

Tomatoes by Eve Fox, Garden of Eating blog, copyright 2011

Slice them in half (or into quarters if you're using a rounder, fatter variety) and lay them in a single layer on parchment covered baking sheets.

Tomatoes about to go into the oven by Eve Fox, Garden of Eating blog, copyright 2011

Drizzle with olive oil, then sprinkle with sea salt and freshly ground pepper(you could throw some basil, thyme or oregano into the mix, too, if you feel like it.)

Tomatoes about to go into the oven by Eve Fox, Garden of Eating blog, copyright 2011

Then slide the sheets in and cook them at this low temperature for 10-12 hours (or more like 8 if you're using cherry or grape tomatoes since they're much smaller). Check them periodically to make sure they're not getting too dried out for your taste (and to make sure your oven is still on - ours kept turning off for some reason... Not good!)

Tomatoes roasting in the oven by Eve Fox, Garden of Eating blog, copyright 2011

When they're done, let them cool down. Remove however many you plan to scarf down in the next week and put them in an airtight container with a lid.

Oven-roasted San Marzano tomatoes by Eve Fox, Garden of Eating blog, copyright 2011

Then freeze the rest on their sheets, pack them into glass jars or freezer bags and toss them into the freezer.

Two freezer bags of oven roasted tomatoes by Eve Fox, Garden of Eating blog, copyright 2011

These are DIVINE atop some goat cheese on crackers or baguette, chopped in salad, added to sauces, or just eaten on their own. I think you'll find them quite addictive..

Wednesday, April 25, 2012

Mussels in White Wine Sauce

Mussels in White Wine Sauce

Mussels in White Wine Sauce
My friend Guy (that's pronounced "Gee" with a hard "g") grew up in Southern France, in Provence, near the sea. And like so many people from Provence, Guy has a passion for all things seafood, especially mussels, or as the French call them, "moules". Mussels steamed in white wine and served in a sauce made from the cooking liquid with butter and shallots is a classic French preparation of mussels, moules mariniere. This is Guy's method for moules mariniere, the way he grew up making it in France, and one of the easiest and loveliest ways of preparing mussels. It is wonderful for an appetizer or a light lunch, and excellent with a glass of white wine and some crusty bread.
moules-mariniere-c.jpg
Print Options

Mussels in White Wine Sauce Recipe

  • Prep time: 20 minutes
  • Cook time: 15 minutes
When purchasing mussels be sure they smell like the ocean, not fishy. Don't buy any whose shells are cracked or open or any that refuse to close their shells when you handle or tap them, those are likely dying or dead. Try to cook the mussels immediately (unwrap them as soon as you get home), but if you have to wait place them in a bowl and cover them with a damp towel so they can breathe.

Ingredients

  • 2 pounds mussels, scrubbed clean under running water
  • 1/2 cup dry white wine
  • 2 Tbsp butter
  • 1/4 cup minced shallots
  • 1 Tbsp minced garlic
  • 2 teaspoons flour (optional, omit for gluten-free version)
  • 1/4 cup minced parsley

Method

1 Put the mussels in a bowl of salted water (1 Tbsp salt per quart of water) for 10-15 minutes. Throw out any that are wide open or refuse to close when you handle them as these ones are likely dead. Looking over the closed mussels, see if any still have their beards (long hairy byssal threads which help anchor the mussel to surfaces) and pull them out, pulling slowly and strongly towards the hinge of the shell.
mussels-white-wine-sauce-1.jpgmussels-white-wine-sauce-2.jpg
2 Put 1/2 cup of dry white wine in the bottom of a large pot (at least 4-quart). Add the mussels to the pot. Cover and bring to a boil and then reduce the heat to low. As the mussels cook, they will release their highly flavored water into the pot. Cook until shells have opened, and the mussels are just cooked, looking steamed and soft, 5 to 7 minutes. Take care not to overcook, or the mussels will be rubbery and hard. Once the mussels are cooked, carefully remove them from the pot to a bowl, one-by-one using tongs, including those that have broken loose from their shells. Do not discard the water in the pot!
3 Let the water in the pot settle for a minute. Any grit will settle to the bottom. Gently pour out the cooking water into a measuring cup, leaving the grit in the pot to discard of later. If the water you've measured out is still a little gritty, filter out the grit using a sieve.
mussels-white-wine-sauce-3.jpgmussels-white-wine-sauce-4.jpg
mussels-white-wine-sauce-5.jpgmussels-white-wine-sauce-6.jpg
4 Melt the butter in a medium-sized saucepan. Add the shallots and cook a couple minutes until translucent. Add the garlic and cook a minute more. If you want your sauce to be a little thick, add a teaspoon or two of flour to the pan, stir to combine. (Otherwise skip the flour.) Slowly add about a cup of the filtered mussel cooking water to the saucepan, stirring to create a smooth sauce. Add the minced parsley to the sauce.
5 Place mussels in serving bowls. Pour some sauce over each bowl of mussels.
Serve immediately. Serve with crusty bread for dipping in the sauce.
Yield: Serves 2 as a meal, 4 as an appetizer or side dish.

Tuesday, April 24, 2012

Zucchini-Ribbon "Lasagna"


Serves 9

Ingredients

  • For the Sauce (makes 3 cups)

    • 1 can (28 ounces) whole peeled plum tomatoes, with juice
    • 2 tablespoons extra-virgin olive oil
    • 1 small onion, finely chopped (1 cup)
    • 1/4 teaspoon red-pepper flakes
    • 12 ounces ground turkey, preferably dark meat
    • 2 tablespoons chopped fresh oregano
    • 2 teaspoons coarse salt
  • For the Lasagna

    • 2 medium zucchini, trimmed
    • 1 cup part-skim ricotta cheese
    • 1/4 teaspoon extra-virgin olive oil
    • Freshly ground pepper
    • Garnish: Fresh oregano

Directions

  1. Make the sauce: Pulse tomatoes with
    juice in a food processor until finely
    chopped. Heat oil in a large straight-sided
    skillet over medium heat. Cook
    onion and red-pepper flakes, stirring
    occasionally, until onion is tender,
    about 8 minutes. Add turkey; cook,
    breaking up any large pieces, until
    browned, 3 to 4 minutes. Add tomatoes;
    bring to a boil. Reduce heat; simmer
    until thick, about 20 minutes. Stir
    in oregano and salt. Let cool.
  2. Make the lasagna: Preheat oven to
    375 degrees. Slice zucchini lengthwise into
    thin strips (about 1/8 inch thick) using
    a mandoline or a sharp knife. Place 5
    or 6 zucchini slices, overlapping slightly,
    in the bottom of an 8-inch square
    baking dish. Top with 1 cup sauce. Dot
    with 1/4 cup ricotta. Repeat twice with
    zucchini, remaining sauce, and 1/2 cup
    ricotta, alternating direction of zucchini.
    Top with remaining zucchini,
    alternating direction; brush with oil.
    Dot with remaining 1/4 cup ricotta. Season
    with pepper. Bake, uncovered, until
    lasagna bubbles and top browns,
    50 to 60 minutes. Let stand for 10 minutes.
    Garnish with oregano.

Wednesday, April 18, 2012

Strawberry- Mint Mojito

The Gardener's Eden


Strawberry-Mint Mojito

Ingredients (makes one cocktail):
6-8     strawberries washed and quartered, plus extra for garnish
1-2     tsp white sugar
1/2     lime cut into quarters
4         sprigs of mint – (pinch first 3-4 sets of tender leaves and tip)                             {ideally Mentha villosa & p.s don’t stint on the mint!}
2         ounces of fine Puerto Rican white rum*
1/2     cup of cracked, not crushed, ice cubes
Club soda to top glass

BRUSCHETTA


Ingredients:
2 tomatoes, chopped into about 1/2-inch pieces, with as much seeds removed as possible
6 basil leaves, chopped
1 tsp balsamic vinegar
1 baguette or country loaf cut into about 1/2-inch or 3/4-inch slices
olive oil
fresh garlic
salt and pepper to season

Directions:
1. In a medium bowl, stir together the chopped tomatoes with the basil and balsamic vinegar. Set aside.

2. Lay out the slices of bread on a baking sheet and brush the tops with olive oil. Toast in a 350-400º oven until bread is toasted, golden-brown and crisp.

3. Remove from oven and immediately rub the top of each slice with fresh garlic. Top with tomato mixture and season with salt and pepper. Serve immediately.

Roasted Red Bell Pepper-Jalapeno Hummus

I have been crazy about Red Pepper Hummus lately so I decided that I should make my own. I buy at least one tub of hummus a week for about $4.00, which can get pretty costly. This recipe is easy to make and will last you for at least a few days. Here is my homemade recipe:


Roasted Red Pepper-Jalapeno Hummus

3 cans of garbanzo beans
1 red bell pepper
1 jalapeno
1/2 cup of garlic cloves
1 cup of lemon juice
1/2 cup of tahini

Roast red bell pepper & jalapeno until brown. Remove from oven. Put garbanzo beans, garlic cloves, lemon juice, tahini, red bell pepper, jalapeno, & sea salt in food processor.

Do It Yourself~Fresh Pesto


 Posted by Michelle in O.P.P.Style♥
Picture from cooking channel
Basil Pesto!
5 1/2 pounds genovese basil, weighed before picking leaves
1/2 pound walnuts, toasted
6 extra large cloves of elephant garlic, or more depending on flavor
4 cups extra virgin olive oil, plus extra for topping jars
1 1/2 pounds parmesan cheese, rough chopped or store bought corsely grated
2 teaspoons sea salt or more to taste
18 Kerr's Wide Mouth 8oz mason jars or 8oz plastic deli containers
Prepare an ice bath in a clean sink or large bowl. In a large non-reactive pot boil moderately salted water for blanching. In batches blanch basil for 2 seconds, remove immediately and plunge into ice bath. Drain and set aside in refrigerator. Repeat until all basil is blanched, changing blanching water if it turns green. Cut garlic cloves in half, remove tiny germ inside, and blanch in boiling water for ten seconds, remove to ice bath.
Due to the large quantity of ingredients this pesto is best made in a few batches that are equally divided. In a food processor fitted with a metal blade add garlic and walnuts and pulse to roughly chop. Add basil pressed dry of water, and cheese. Pulse to chop while drizzling olive oil. This must be done quickly. If the food processor's motor gets too hot it will begin to turn the basil black.
Mix separate batches together, check for correct seasoning and adjust. Fill jars just below screw mark level and top with 1/4" of extra virgin olive oil. This will help to seal the pesto so it doesn't turn color.
Pesto can be kept in the refrigerator for up to 2 weeks. Or frozen for 3 months.

Tuesday, April 17, 2012

Which oils are better for you?

Posted by Michelle in Ocean Pacific Papaya Style
the huge variety of oils at the store have always put me on overload. which ones are the best? why? what are they all for? well i decided to put my research hat on and find out a little bit more about them. here is a quick overview of the best oils, and some resources to boot. which oils are your favorite?
Art for Kitchen - OLIVE OIL

Extra Virgin Olive Oil
this one is the big winner, woohoo! that’s good, because this is the one i use the most. evoo is a less processed and (therefore) more flavorful oil than other oils and wins for best oil because of it’s monounsaturated (that’s the good one) fats and plant compounds that protect against heart disease and cancer. lucky for us, it also tastes oh-so-good.
Sesame Oil
It is derived from toasted sesame seeds and may help to lower blood pressure. it’a also great in asian inspired dishes.
Flaxseed Oil
Flax oil is a big component of how we get our heart-protective omega-3 fatty acids in each day. these essential fatty acids protect against bone loss and reduce inflammation in people with arthritis. heating flaxseed oil will destroy it’s nutrients, so keep this one in the fridge and use on salads or in smoothies. (hint: we also add about 1 tbs to toaster’s food each day! it keeps his coat shiny and skin extra healthy.)
Walnut Oil
i haven’t used this oil very much, but i know one thing, i do love walnuts! walnut oil contains a specific antioxidant that helps prevent cancers (say no more!). it turns bitter when heated, so this is another one to keep in your fridge and drizzle over salads or pastas.

 Sunflower Oil  
you got it, this one is made from sunflower seeds! it has a light taste and contains vitamin e, which reduces your risk for heart attack.
 Did you know?
it’s best to store your healthy oils in a dark, dry cabinet away from heat or sunlight (preferably, in the fridge). nut based oils such as walnut, flaxseed and sesame need must be refrigerated as they can turn rancid at room temperature.
for a more in depth look at oils, read this great article on cooking oils.
source:simple living

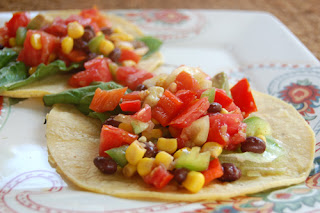
Garden Catch All Salsa Recipe by Amanda Joy

I have an absolute love for tomatoes!! I love making salsa!! It is so yummy on my fish, chicken, or shrimp tacos. It is also good just by itself ♥ I came upon this recipe on Bonnie's Seasonal Recipes. Yummy! Enjoy!!

Posted by Michelle in Ocean Pacific Papaya Style

ingredients:

4 large tomatoes, chopped
2 medium peppers, chopped
1/2 onion, chopped
1 avocado, chopped
1 can corn, drained
1 can black beans, rinsed and drained
3 garlic cloves, minced
2 tbsp fresh chopped cilantro
2 tbsp lime juice
1 tbsp vinegar
2 tsp olive oil
1 tbsp sugar
1 1/2 tsp cumin
1 tbsp chili powder
dash of hot sauce
~~~~~~~~~~~~~~~~~~~~~~~~~~~~~~~~~~~~~~~~~~~~~~~~~~~~~~~~~~♥

Monday, April 16, 2012

Black beans with smoked poblanos topped with blackened shrimp, lemon Greek yogurt, and egg!


A friend of mine made this yummy breakfast this morning. I had to share. By Mark Butler

Healthy Eating Habits


Vegetarian Taco Salad


By Eating Well Magazine
Vegetarian Taco Salad
Makes: 6 servings, about 1 1/2 cups each
Active time: 40 minutes | Total: 40 minutes | To make ahead: Prepare through Step 1, cover and refrigerate for up to 3 days; reheat slightly before serving.
Cost per serving: under $2
Nobody will miss the meat in this colorful, zesty vegetarian taco salad. The rice and bean mixture can be made ahead and the salad quickly assembled at mealtime. Recipe by Nancy Baggett for EatingWell.
2 tablespoons extra-virgin olive oil
1 large onion, chopped
1 1/2 cups fresh corn kernels (see Tip) or frozen, thawed
4 large tomatoes
1 1/2 cups cooked long-grain brown rice (see Tip)
1 15-ounce can black, kidney or pinto beans, rinsed
1 tablespoon chili powder
1 1/2 teaspoons dried oregano, divided
1/4 teaspoon salt
1/2 cup chopped fresh cilantro
1/3 cup prepared salsa
2 cups shredded iceberg or romaine lettuce
1 cup shredded pepper Jack cheese
2 1/2 cups coarsely crumbled tortilla chips
Lime wedges for garnish
1. Heat oil in a large nonstick skillet over medium heat. Add onion and corn; cook, stirring, until the onion begins to brown, about 5 minutes. Coarsely chop 1 tomato. Add it to the pan along with rice, beans, chili powder, 1 teaspoon oregano and 1/4 teaspoon salt. Cook, stirring frequently, until the tomato cooks down, about 5 minutes. Let cool slightly.
2. Coarsely chop the remaining 3 tomatoes. Combine with cilantro, salsa and the remaining 1/2 teaspoon oregano in a medium bowl.
3. Toss lettuce in a large bowl with the bean mixture, half the fresh salsa and 2/3 cup cheese. Serve sprinkled with tortilla chips and the remaining cheese, passing lime wedges and the remaining fresh salsa at the table.
Per serving: 395 calories; 17 g fat (5 g sat, 5 g mono); 20 mg cholesterol; 52 g carbohydrate; 0 g added sugars; 14 g protein; 9 g fiber; 459 mg sodium; 774 mg potassium. Nutrition bonus: Vitamin A & Vitamin C (38% daily value), Calcium & Folate (23% dv), Potassium (22% dv), Magnesium (21% dv), Calcium (23% dv), Iron (15% dv).

Kitchen Tips: To remove corn kernels from the cob, stand an ear of corn on its stem end and slice the kernels off with a sharp, knife.
To cook rice, bring 1 cup water and 1/2 cup long-grain brown rice to a boil in a small saucepan. Reduce heat to low, cover, and simmer at the lowest bubble until the water is absorbed and the rice is tender, about 40 minutes. Remove from the heat and let stand, covered, for 10 minutes. Makes 1 1/2 cups.

Sunday, April 15, 2012

Chicken Tacos

 |   |   | 

Ingredients

  • 16 whole Corn Tortillas (small Size)
  • 4 whole Boneless, Skinless Chicken Breasts, Cut Into Pieces
  • Salt, Cumin, Chili Powder To Taste (or Use Taco Seasoning)
  • 2 Tablespoons Canola Oil
  • 2 cans (4 Ounce) Diced Green Chilies
  • 1-1/2 cup Finely Grated Cheese (cheddar Or Cheddar/jack Mix)
  • Sour Cream
  • Hot Sauce (Chulula Or Other Brand)
  • 2 cups Thinly Sliced Romaine Lettuce (or Any Lettuce)
  • 4 whole Roma Tomatoes, Diced
  • Canola Oil, For Frying Tacos

Preparation Instructions

*Be careful frying with hot oil!*
Season diced chicken liberally. Heat 2 tablespoons oil in large skillet over medium-high heat. Add the chicken and cook for a couple of minutes. Dump in the diced green chilies. Stir and cook until chicken is totally done inside. Turn off heat and set aside.
Have all other ingredients---grated cheese, sliced lettuce, diced tomato, sour cream, and hot sauce---ready.
Also have a plate ready, as well as a stack of five or six paper towels to hold in your hand.
TO FRY
To fry the tacos, heat a couple of inches of canola oil in a heavy skillet over medium-high. Place some chicken in the middle of a tortilla, then fold tortilla in half. Clamp the tortilla shut with a pair of heat-proof metal tongs, then carefully lay the taco---one side down---in the oil. As you lay it in the oil, use the tongs to hold the top side down for a few seconds to form it in place. Once it stays put, repeat with two other tacos. Turn tacos after 30 to 45 seconds, or when each side gets light golden brown (not too brown.)
One at a time, remove tacos from the pan with tongs, holding sideways as you remove them to allow oil to drip out of the sides. Place the taco in the stack of paper towels. Fold the sides and corners around the taco to tightly hold it, then give it three or four shakes to remove excess oil. Remove it from the paper towels and place on a plate. Repeat with other tacos in the pan.
As you continue frying the other tacos, have someone carefully place some grated cheese inside the tops of the tacos (gently pry them open just enough to place the cheese in). Then just let them sit until ready to serve---the cheese will melt as it sits in the warm taco.
To serve, garnish in this order: a smear of sour cream, dashes of hot sauce, shredded lettuce, diced tomato. You'll need to slightly open up the tops of the tacos to get all the garnishes in there.
Tacos will be hot for a minute or two after frying, so don't rush into eating! They'll stay nice and warm for a little while after frying.